How to Create IAM User in AWS Step-by-Step
Dear Reader, I hope you are doing great. Today, I am here with a post on how to create IAM user in AWS step by step. This is a beginner-friendly tutorial. So don’t worry, if you have just started your journey with AWS.
Apart from creating the user, we will also see how to assign permission to the user during the creation process.
Alright?
Okay!!!
Don’t want to miss any posts from us? join us on our Facebook group, and follow us on Facebook, Twitter, LinkedIn, and Instagram. You can also subscribe to our newsletter below to not miss any updates from us.
Before creating an IAM user, let’s try to understand them a bit.
What is an IAM user and why should you create them?
AWS IAM user is an entity created in AWS that lets you interact with AWS resources. They usually represent a physical person who needs access to your AWS account. However, sometimes they may represent an application that needs to interact with AWS services.
A perfect example of why should you create an IAM user –
Imagine you are the owner of a start-up and you want to create an application using AWS. You can’t share your credentials with anyone but you want them to be able to work in your AWS account.
In this case, AWS allows you to create users and assign them permission based on what they need to do so that they can log in to the console or access AWS programmatically with their own credentials.
Did that make sense?
I guess so !!!
Now we know a bit about IAM users, so let’s create one step by step !!!
Steps to Create IAM User in AWS Step by Step
- Login to AWS Management Console and Navigate to IAM
- Click on Users in the IAM Dashboard
- Click Add user
- Fill Up the Details
- Provide Required Permission to the User
- Add a tag to your user(Optional)
- Review User Details and Click Create user
- Login as IAM User(Actual IAM user will do this)
Step 1: Log in to AWS Management Console and Navigate to IAM
To create an IAM user in AWS, the very first step is to log in to the AWS Management Console and open the IAM service.
You can either go to Services -> Security, Identity, & Compliance -> IAM
or
Search IAM in the console search bar as shown below and click on IAM.

Step 2: Click on Users in the IAM Dashboard
Once you click on IAM, you will be redirected to the IAM dashboard. You will see a similar screen below.

Click on Users in the left navigation menu as highlighted in the above screenshot
Step 3: Click Add user

Step 4: Fill Up the Details
- Provide a User name(Must be unique within the account)
- Select an access type for your user based on the requirement
- If you are creating a user for someone else, it makes sense to keep Require password reset checkbox checked
Note: You can create more than one user at a time by using add another user button

Once you have filled up details, click on Next: Permission
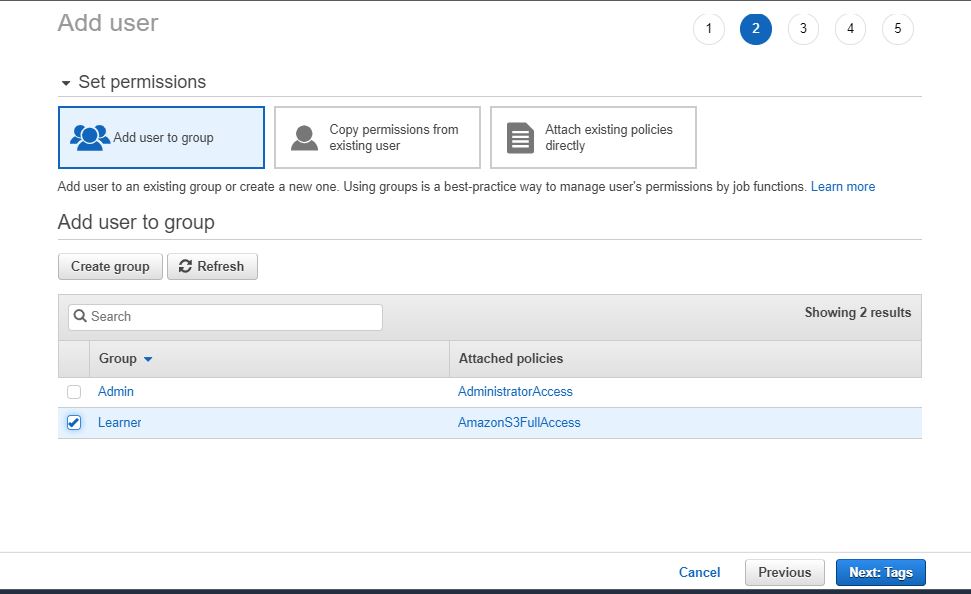
Step 5: Provide Required Permission to the User
There are three ways to set permission for the user
- Add user to group
- Copy permission from existing user
- Attach existing policies directly
You can use any of the options at your convenience. However, it’s a good practice to create a group for users who need similar permission, attach policies to the group and then add the user to the group.
I have already created two groups, so I will add this user to the Learner group which has S3 full access
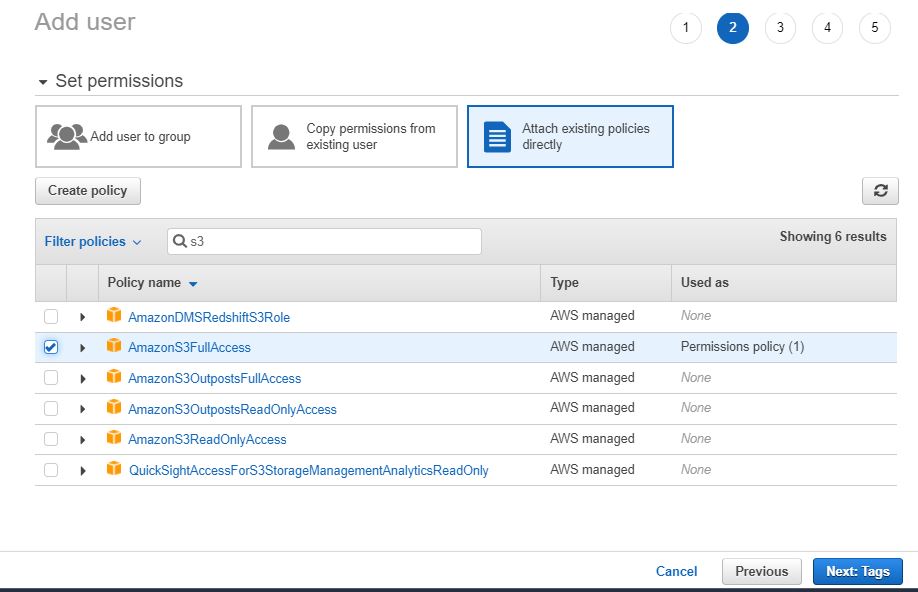
On the other hand, if you wish to attach existing policies directly, click on Attach existing policies Directly tab
Filter appropriate policy by searching and selecting what you need. For example, I have searched for S3 and selected AmazonS3FullAccess as you can see in the below screenshot.
Note: If you think already existing policies don’t fit your needs, you can create a custom policy and assign that instead. You can do that using the Create policy button mentioned in the below screenshot.
Once you are done selecting permission as per your need, click Next: Tags to move to the next step
Step 6: Add a tag to your user(Optional)
Adding tags to your user is completely optional and you may skip this step altogether. However, tags can provide extra information about the user, for example, department and later can be used to provide permission based on tag.

After you are done, Click on Next: Review
Step 7: Review User Details and Click Create user
Review user details to crosscheck if you have entered all the information correctly. If you think something is not correct or as per your need, you may decide to go back using the Previous button and modify it.

If everything is good, you can click Create user

The user is successfully created and you see a success message as above. Now comes the important part, Download the .csv file which has your user credentials and sign-in link that you can share with your IAM user.
Note: Please note that as the message says, this is the last time you can download the .csv file so make sure to download it before closing the dialog. Although, you can create new credentials anytime just that they are not available for downtime after closing this dialog.
If you are an admin creating an IAM user for your team member, your job is done here. Just share the .csv(Credentials) with your user and you are done.
However, if you are someone, who is doing this for learning purposes, you can use the downloaded creds to log in as an IAM user to better understand end to end-to-end flow
Step 8: Login as an IAM User(Actual IAM user will do this)
Open the credentials file(.csv file) you downloaded and gran details such as username, password and sign-in link.
Click on the sign-in link present in the .csv file
You will be redirected to the AWS console login page with the AccounId/Alias field already filled up.

Enter your username, and password as shown in the above screenshot and click Sign in
If you have entered everything correctly, you will be prompted to change password screen(Remember while creating the user, we selected the option that the user will need to change his/her password)
Enter your old and new password and click Confirm password change

Note: Please note that you must comply with the password policy set by your administrator. If you get an error like you don’t comply with the password policy, check the password policy with the administrator
If all is fine, your password is changed and you are logged into your AWS account as an IAM user.

Congratulations !!! You have successfully created an IAM user.
You also learned how an IAM user will log in using the .csv creds provided by you.
Conclusion
In this in-depth tutorial, You learned “How to Create IAM User in AWS Step by Step”. We created a user from scratch, assigned permission to it and also learned how to log in as an IAM user into the AWS console.
If you have any questions, please feel free to drop in the comment section.
Enjoyed the content?
Subscribe to our newsletter below to get awesome AWS learning materials delivered straight to your inbox.
I hope you enjoyed this tutorial. If you have a question, feel free to drop in comment. I will be more than happy to answer your query.
Meanwhile you can also –
Suggested Read:
- Difference between AWS Root user and IAM User
- Attach an IAM Role to an EC2 Instance using CloudFormation
- Create an S3 Bucket using CloudFormation
- Understand IAM PassRole to Secure your AWS Infrastructure
- AWS S3 Encryption: Ways to Secure Your Data in S3
- How to Create S3 Bucket using CloudFomation
- AWS S3 Storage Classes: Everything You Need to Know
- AWS SQS Standard vs FIFO Queue
- How to Create S3 Bucket Policy using CloudFomation
- Provision ACM certificate using CloudFormation
- Create SSM Parameter using CloudFormation