How to Attach Elastic IP to EC2 Instance using Terraform
Dear Reader, I hope you are doing great. In my previous posts, we talked about Elastic IP and its significance with respect to EC2 instances. We also saw how to attach an elastic IP to an EC2 instance using AWS console and CloudFormation.
In this post, you will learn how to attach Elastic IP to EC2 Instance using Terraform. We’ll allocate an elastic IP to our AWS account and then attach that EIP to one of the EC2 instances using Terraform.
Alright…
So, are you ready?
Important Note: I assume that you already know terraform. You also know how to create resources using terraform on AWS. If not, I highly recommend you to check my previous post: Getting Started With Terraform on AWS in Right Way.
I also recommend a course that I took in my early days of terraform to get my journey kickstarted. Check it out on Udemy
Prerequisite
- An active AWS account: See How to Setup Free Tier Account in AWS in Right Way
- An IAM user with permission
- Terraform installed on your system
- AWS CLI
- Basic knowledge of Terraform
Overview of Elastic IP with respect to EC2
As you might already know, if you launch an EC2 instance in your default VPC, a public IP gets automatically assigned to your instance. You use that to connect to(SSH) your EC2 instance remotely or to access an application on your instance online via public IP or public DNS.
This sounds good.
But the problem which you might already be aware of is public IPs are dynamic in nature. This means when you stop your instance and start it again, your instance’s public IP changes. Needless to say, you no more can access your instance using your previous public IP.
It becomes even more difficult when you have an “A” record in route 53 that maps to your instance’s public IP. It simply doesn’t make sense to update your A record every time your instance changes the IP. Does it?
Talking about the solutions, one of the ways (not the best-mind it) in such cases is to assign an elastic IP to your instance which is a static public IP and will not change on the stop and start of your instance. Read my previous post to understand it in even more detail (Link below).
Suggested Read: How to Assign an Elastic IP to your EC2 Instance in AWS
What’s so Special About Elastic IP That you need to Know
I think by now, this should be clear. However, just to sum things up, I will reinstate these points again.
- Elastic IPs are public IPs that are static and associated with your AWS account.
- Unlike public IP, EIP do not change for your instance when you stop and start your EC2 instance
- You can check EIP pricing on AWS documentation.
Steps to Attach Elastic IP to EC2 Instance using Terraform
- Initialize the Provider
- Create an EC2 Instance
- Create an EIP or Elastic IP
- Associate EIP to EC2 Instance
- Validate EIP Association
Let’s get started with the steps…
Don’t want to miss any posts from us? join us on our Facebook group, and follow us on Facebook, Twitter, LinkedIn, and Instagram. You can also subscribe to our newsletter below to not miss any updates from us.
Step 1: Initialize the Provider
Create a directory for your terraform files. Once done, create a new .tf file that will contain the required resources.
First of all, we’ll add the provider declaration to let Terraform know that we’ll be working with the AWS provider.
provider "aws" {
  profile = "default"
}
If you want to create your resource in any other region then your profile is set up, pass region value as well in provider declaration.
For example-
provider "aws" {
  profile = "default"
  region  = "ap-south-1"
}
Once done, run terraform init to download provider-specific codes/plugins. This is how it looks like when you run terraform init.

Step 2: Create an EC2 Instance
We have declared the provider in the previous section. Let’s add an EC2 resource to create one.
provider "aws" {
  profile = "default"
  region  = "ap-south-1"
}


#Variable Declarations
variable "ami-mumbai" {
  type = string
  default = "ami-01216e7612243e0ef" #AMI for ap-south-1
}

variable "key-name" {
  type = string
  default = "MyDemoEC2eyPair"
}

#Create EC2 instance
resource "aws_instance" "demo-instance" {
  ami = var.ami-mumbai
  instance_type = "t2.micro"
  key_name = var.key-name
}
As you can see, we have added two variables for AMI and key. You can change it based on your need. You can find AMI for your region by going to the AWS EC2 dashboard.
We will gradually add other resources to our configuration file.
Run terraform apply to create the EC2 resource. Enter yes when prompted as shown below and an EC2 resource is created for you as can be seen in the screenshot.

Step 3: Create an EIP
Add a resource to allocate an EIP for your AWS account.
# resource block for eip #
resource "aws_eip" "demo-eip" {
  vpc = true
}
vpc = true indicates that this EIP is for use in VPC (vpc).
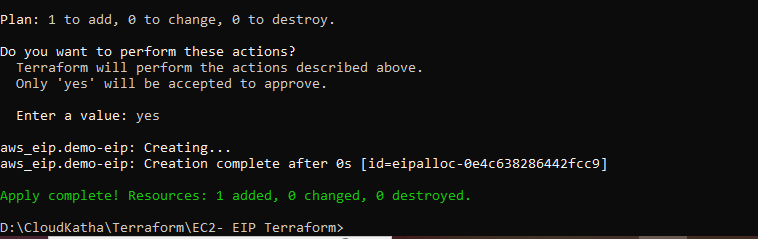
After adding an EIP resource and running terraform apply you can see that an EIP resource is created.
Step 4: Associate EIP to EC2 Instance
There are two ways in which you can do it.
Using the instance property of the aws_eip resource or by using the aws_eip_association resource.
1. Using the instance attribute of aws_eip
resource "aws_eip" "demo-eip" {
  instance = aws_instance.demo-instance.id
  vpc      = true
}
2.By using aws_eip_association resource
#Associate EIP with EC2 Instance
resource "aws_eip_association" "demo-eip-association" {
instance_id = aws_instance.demo-instance.id
allocation_id = aws_eip.demo-eip.id
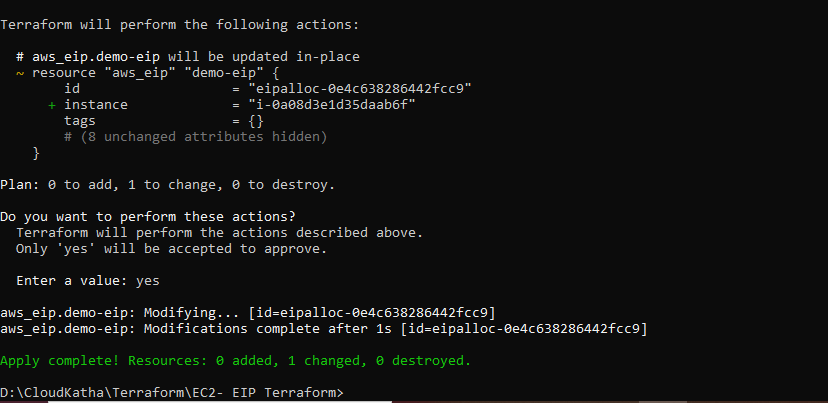
}For example, as you can see in the screenshot below, once we have added the instance property to aws_eip, the resource is modified and EIP is associated to the mentioned instance.
Note: aws_eip_association is useful in scenarios where EIPs are either pre-existing or distributed to customers or users and therefore cannot be changed. (Copied from HashiCorp docs)
Step 5: Validate EIP Association
Login to AWS Management Console and navigate to the EC2 dashboard. Select your EC2 instance and click on it to go to the instance details screen.
You can see that public IP and elastic IP is shown as same as you would expect.

For your satisfaction, stop and start your Ec2 instance. This time you will notice that public IP doesn’t change and is always equal to elastic IP.
Cleanup
If you are doing this tutorial just for learning purposes, consider deleting the resource that you have created so that you don’t get charged for it. And you can sleep peacefully.
Run terraform destroy command. And once you say yes to the prompt, all the created resources are deleted and you get a success message like below.

Related: How to Create Cost Budget in AWS to Avoid Billing Shock
Final Terraform Configuration to Attach Elastic IP to EC2 Instance using Terraform
For your convenience, I am putting the final consolidated configuration again so that you can take and create it.
provider "aws" {
  profile = "default"
  region  = "ap-south-1"
}


#Variable Declarations
variable "ami-mumbai" {
  type = string
  default = "ami-01216e7612243e0ef" #AMI for ap-south-1
}

variable "key-name" {
  type = string
  default = "MyDemoEC2eyPair"
}

#Create EC2 instance
resource "aws_instance" "demo-instance" {
  ami = var.ami-mumbai
  instance_type = "t2.micro"
  key_name = var.key-name
}

#Create an Elastic IP
resource "aws_eip" "demo-eip" {
  vpc = true
}

#Associate EIP with EC2 Instance
resource "aws_eip_association" "demo-eip-association" {
  instance_id   = aws_instance.demo-instance.id
  allocation_id = aws_eip.demo-eip.id
}

output "elastic_ip" {
  value = aws_eip.demo-eip.public_ip
}
Conclusion
This post taught us how to Attach Elastic IP to EC2 Instance using Terraform.
Let’s summarize what we did in this post.
- We learnt about Elastic IP and their need.
- Created an EC2 instance and Elastic IP.
- Associated Elastic IP with EC2 Instance using Terraform.
- Validated the EC2 and EIP association in the AWS console.
- Cleaned up resources to avoid billing shock.
Enjoyed the content?
Subscribe to our newsletter below to get awesome AWS learning materials delivered straight to your inbox.
If you liked reading my post, you ca motivate me by-
- Adding a comment below on what you liked and what can be improved.
- Follow us on Facebook, Twitter, LinkedIn, Instagram
- Share this post with your friends and colleagues.
Suggested Read:
- How to Enable Ping on an EC2 Instance
- How to Launch an EC2 Instance in AWS Step by Step
- Understand IAM PassRole to Secure your AWS Infrastructure
- Attach an IAM Role to an EC2 Instance using CloudFormation
- How to Attach an IAM role to EC2 instance using Terraform
- AWS EC2 instance Purchasing Options: All you need to know
- Install Apache Web Server on a EC2 instance in AWS