Automated React App Deployment from CodeCommit to S3 using CodePipeline
Gone are the days when companies used to deliver production deployments every few months.
Now, in the time of agile, customers are looking for MVP(Minimum Viable Product) as early as possible.
And after the MVP, they need frequent deployment of additional features. May be every 15 days or some companies even deploy every few hours.
You might think, one deployment takes so much time, how to do so many deployments?
Don’t worry !!!
CICD Pipelines are there for your rescue. Once automated, all you need to do is commit your code in your source code repository and the rest is taken care of by the pipeline.
Don’t want to miss any posts from us? join us on our Facebook group, and follow us on Facebook, Twitter, LinkedIn, and Instagram. You can also subscribe to our newsletter below to not miss any updates from us.
How to Deploy React App to S3?
Before we automate the react app deployment from CodeCommit to S3, let’s first understand what it takes to deploy a react app to AWS S3.
Once you create your react app and test it locally, you can simply create a production-ready app by running the below command.
npm run buildAfter this command executes, it creates a build folder in the root directory. It basically bundles your React app and minifies it into simple HTML, CSS, and JavaScript files.
It provides an entry point, where your entire React app resides.
Hosting a React App on S3
Ideally, we have the optimized content of our react app in the build folder. So all we need is to copy the content of the build folder into an S3 bucket with website hosting enabled.
And you are done. 🙂
It’s that simple !!!
But wait a minute 🙂
Are you planning to copy the content of the build folder manually into the bucket?
I am sure, you are not !!!
In this post, we will see how to create a CICD pipeline using CloudFormation so that your pipeline is automated and you can sleep peacefully.
All I mean is, you only worry about making your React app better and the rest will be taken care of by the pipeline.
Did I convince you enough to go through this post 😛
Well, let’s go then !!!
Steps to Automate React App Deployment from CodeCommit to S3 using CodePipeline
- Create a React App and Test it Locally
- Create a BuildSpec file to be used by CodeBuild
- Zip your code to create a code commit repo
- Prepare CloudFormation Template for Pipeline
- Create the Pipeline Stack
- Make some changes to the code and push to code commit
Step 1: Create a React App and Test it Locally
Let’s start with creating a new React app. If you already have one, please feel free to head straight to step 2.
I am using AWS Cloud9 IDE for this and it comes with the latest npm version. Please feel free to use your favourite IDE.
Create a new react app–
npx create-react-app my-app Navigate to created app directory-
cd my-appStart NPM server-
npm startTest Locally–
After the server is started, you can test your application on localhost. I am on cloud9 IDE and I will preview my running application from the menu bar.

Step 2: Create a BuildSpec file to be used by CodeBuild
We will be using AWS CodeBuild to build our react app and then copy the content of the build folder into the S3 bucket.
CodeBuild needs a build spec specification or commands that it needs to execute when it starts building our code.
You can even add test code and add a test command so that CodeBuild your test your code as well.
Create a file buildspec.yml into the root directory of your application like below.

Add the below content in your buildspec.yml file.
version: 0.2
phases:
  install:
    runtime-versions:
      nodejs: 12
    commands:
      # Install dependencies needed
      - npm install

      # Upgrade AWS CLI to the latest version
      - pip install --upgrade awscli
  pre_build:
    commands:
      # Build the react app to give an optimized production build
      - npm run build
  build:
    commands:
      # Copy the content of build folder into website s3 bucket
      - aws s3 sync build/ s3://$WEBSITE_S3_BUCKET/
Note: Please note that WEBSITE_S3_BUCKET in the command – aws s3 sync build/ s3://$WEBSITE_S3_BUCKET/ is an environment variable and is set during CodeBuild project creation.
Don’t worry about it now, you will see it in the CloudFormation template when we will prepare one for our pipeline.
Step 3: Zip your code to create a code commit repo
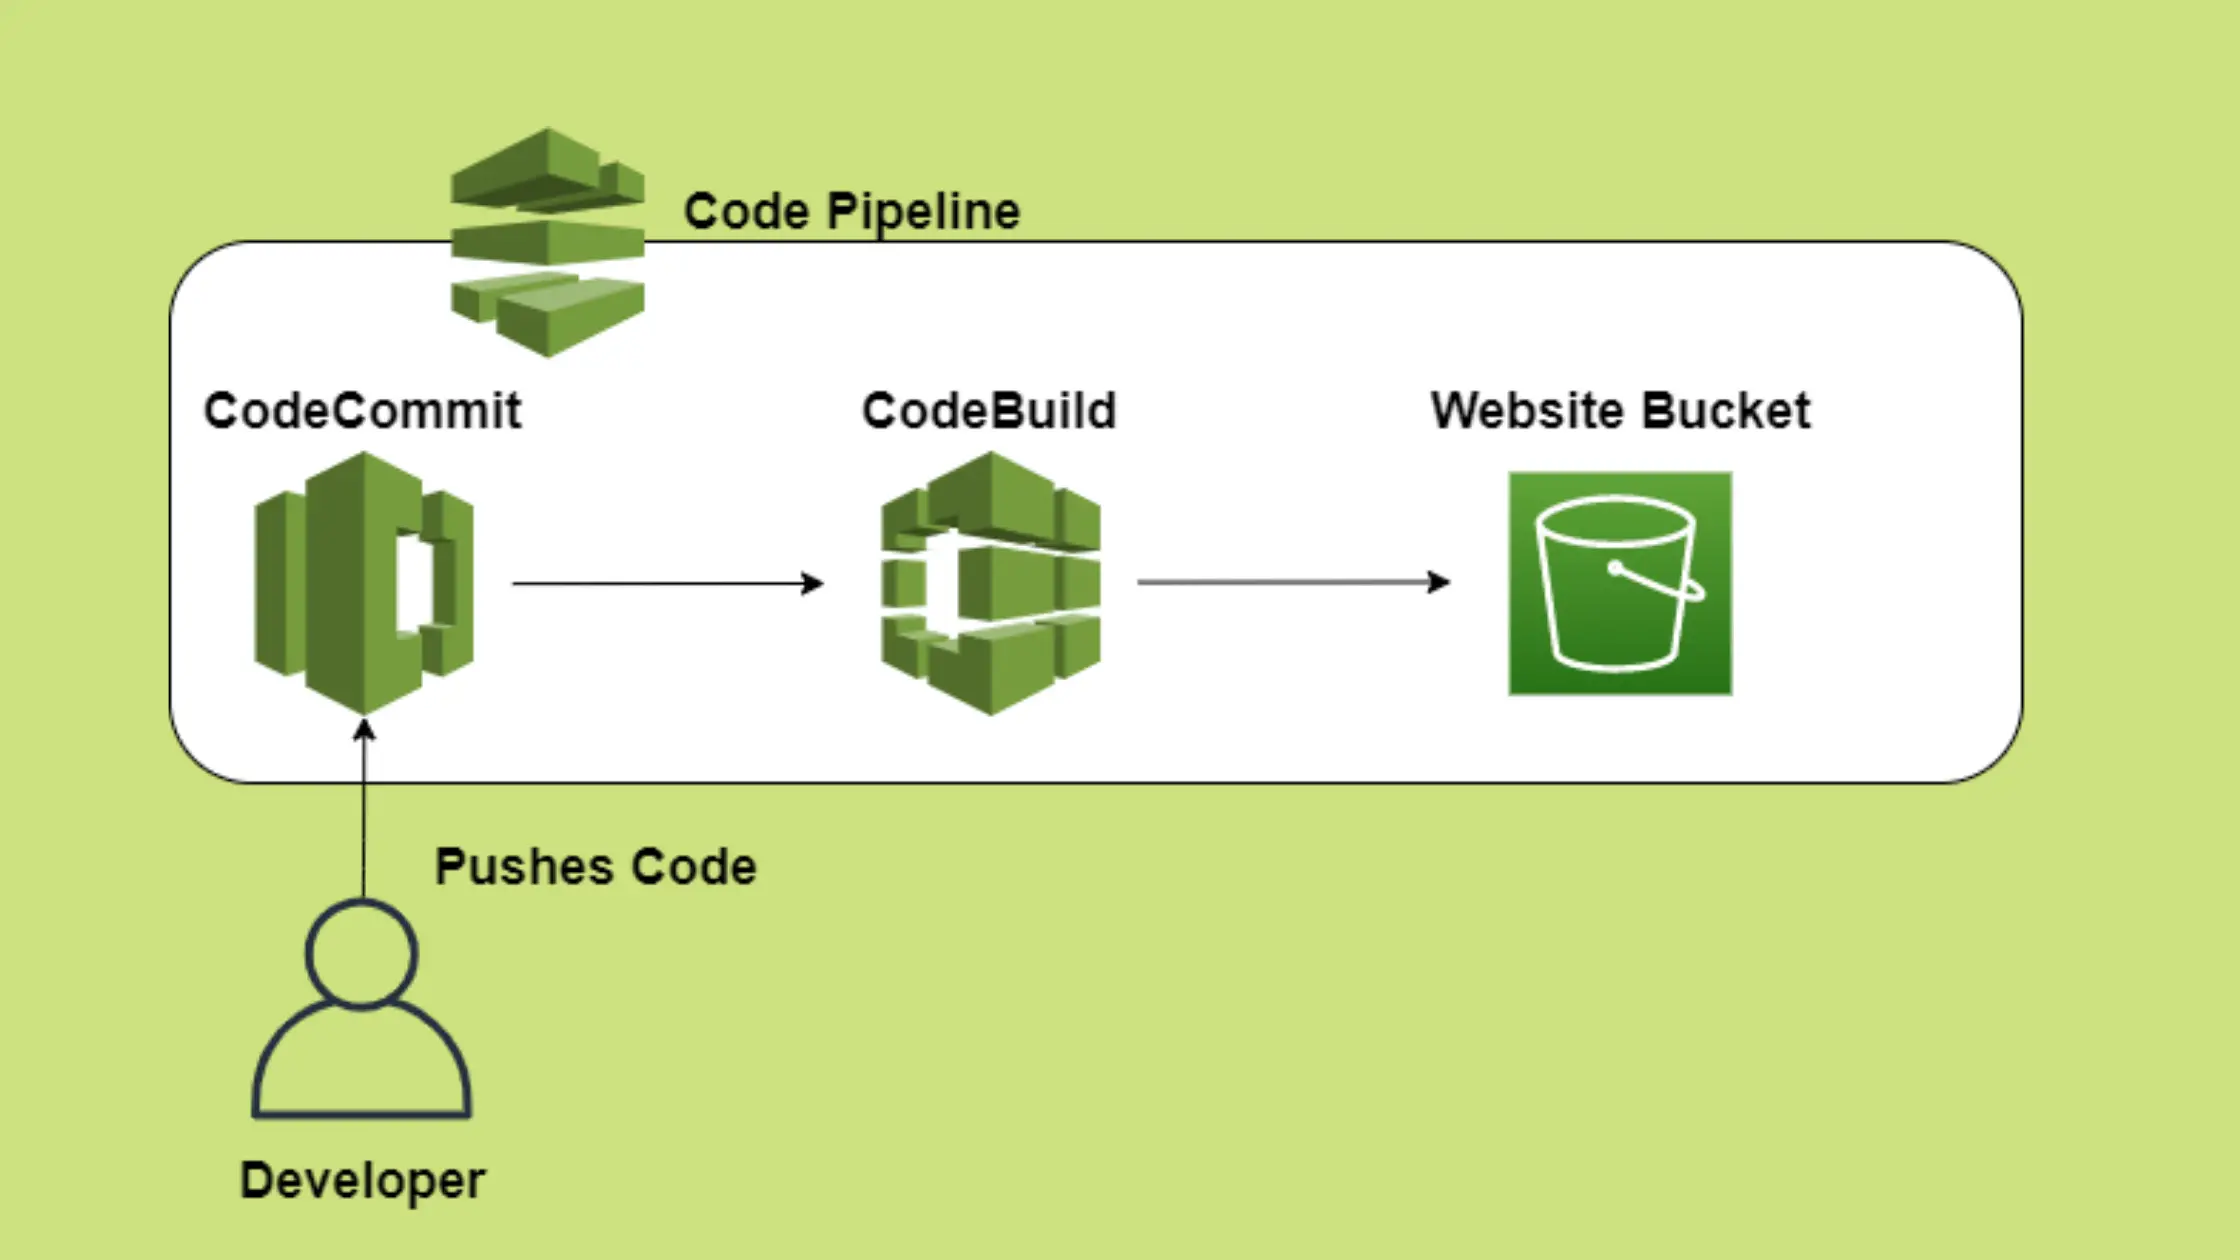
Once you are done testing your new app locally, we will create a CodePipeline using CloudFormation.
Our Pipeline will only have two stages.
- Source- CodeCommit
- Build -CodeBuild
While creating a code commit repo, we can either create an empty repo and upload the code there or create it with your sample code.
As we already have a sample code from above, so I would prefer to create the repo using it.
To do so, we need to create a zip containing all our code.
Note: Please make sure that extracting the zip file is directly giving you the project structure and no nested folder. Also, it should not contain any .git folder or .gitignore file
This is how it looks when I extract my-app.zip

After you are ready with the zipped code, upload it to any S3 bucket you already have. We will need this bucket name and key while creating the CodeCommit repo.
Step 4: Prepare CloudFormation Template for Pipeline
As we want a fully automated CICD pipeline so we will use CloudFormation to create our pipeline and other important resources.
Our template contains the below resources.
- An S3 Bucket to be used for website hosting
- A read policy on the website bucket to allow the public to read
- An artefact S3 Bucket to be used by CodePipeline
- A policy for artefact bucket to allow read, write by CodeBuild etc.
- A CloudWatch event rule to trigger our pipeline on code changes
- A CodeCommit repo to store our code
- A CodeBuild project
- A Toolchain Role
- A Pipeline
Here is the final template.
AWSTemplateFormatVersion: 2010-09-09
Description: Pipeline for the react web app

Parameters:
  ProjectId:
    Type: String
    Description: Project ID.
    Default: my-app
  WebsiteS3Bucket:
    Type: String
    Description: Bucket Name
    Default: preetitest-website
  CodeBucket:
    Type: String
    Description: Bucket in which you have code
    Default: code-bucket
  CodeKey:
    Type: String
    Description: key of zipped code
    Default: test-react/my-app.zip


Resources:

  TargetS3Bucket:
    Type: 'AWS::S3::Bucket'
    Properties:
      BucketName: !Ref WebsiteS3Bucket
      WebsiteConfiguration:
        ErrorDocument: 'index.html'
        IndexDocument: 'index.html'
      AccessControl: PublicRead
      PublicAccessBlockConfiguration:
        BlockPublicAcls: false
        BlockPublicPolicy: false
        IgnorePublicAcls: false
        RestrictPublicBuckets: false
  TargetS3BucketReadPolicy:
    Type: 'AWS::S3::BucketPolicy'
    Properties:
      Bucket: !Ref TargetS3Bucket

      PolicyDocument:
        Statement:
          - Action:
              - 's3:GetObject'
            Effect: Allow
            Resource:
              - !Sub 'arn:${AWS::Partition}:s3:::${WebsiteS3Bucket}/*'
            Principal: '*'

  ArtifactBucket:
    Type: 'AWS::S3::Bucket'
    Properties:
      BucketName: cloudkatha-artifact-bucket

  ArtifactBucketPolicy:
    Type: 'AWS::S3::BucketPolicy'
    Description: Setting Amazon S3 bucket policy for AWS CodePipeline access
    Properties:
      Bucket: !Ref ArtifactBucket
      PolicyDocument:
        Version: 2012-10-17
        Statement:
          - Action:
              - 's3:GetObject'
              - 's3:GetObjectVersion'
              - 's3:GetBucketVersioning'
            Resource:
              - !Sub 'arn:${AWS::Partition}:s3:::${ArtifactBucket}'
              - !Sub 'arn:${AWS::Partition}:s3:::${ArtifactBucket}/*'
            Effect: Allow
            Principal:
              AWS:
              AWS:
                - !GetAtt
                  - ToolChainRole
                  - Arn
          - Action:
              - 's3:PutObject'
            Resource:
              - !Sub 'arn:${AWS::Partition}:s3:::${ArtifactBucket}'
              - !Sub 'arn:${AWS::Partition}:s3:::${ArtifactBucket}/*'
            Effect: Allow
            Principal:
              AWS:
                - !GetAtt
                  - ToolChainRole
                  - Arn

  CodeCommitRepo:
    Type: 'AWS::CodeCommit::Repository'
    Description: Repo application source code
    Properties:
      RepositoryName: !Ref ProjectId
      Code:
        BranchName: main
        S3:
          Bucket: !Ref CodeBucket
          Key: !Ref CodeKey

  CodeBuildProject:
    DependsOn:
      - ToolChainRole
    Type: 'AWS::CodeBuild::Project'
    Properties:
      Artifacts:
        Type: codepipeline
        Packaging: zip
      ServiceRole: !Ref ToolChainRole
      Environment:
        Type: LINUX_CONTAINER
        EnvironmentVariables:
          - Value: !Ref TargetS3Bucket
            Name: WEBSITE_S3_BUCKET
        Image: 'aws/codebuild/standard:3.0'
        ComputeType: medium
      Source:
        Type: codepipeline
      Name: !Ref ProjectId


  ToolChainRole:
    Type: 'AWS::IAM::Role'
    Description: Creating role for codebuild
    Properties:
      Path: /
      RoleName: !Sub 'ToolChainRole-${ProjectId}'
      Policies:
        - PolicyName: ToolChainRolePolicy
          PolicyDocument:
            Statement:
              - Action:
                  - 'codecommit:*'
                  - 'codepipeline:*'
                  - 'codebuild:*'
                  - 's3:*'
                  - 'events:*'
                  - 'iam:PassRole'
                  - 'cloudwatch:*'
                  - 'kms:*'
                  - 'cloudformation:*'
                  - 'logs:*'
                Resource: '*'
                Effect: Allow

      AssumeRolePolicyDocument:
        Statement:
          - Action: 'sts:AssumeRole'
            Effect: Allow
            Principal:
              Service:
                - codebuild.amazonaws.com
                - codedeploy.amazonaws.com
                - codepipeline.amazonaws.com
                - events.amazonaws.com

  SourceEvent:
    Type: 'AWS::Events::Rule'
    Properties:
      EventPattern:
        detail-type:
          - CodeCommit Repository State Change
        resources:
          - !Join [ '', [ 'arn:aws:codecommit:', !Ref 'AWS::Region', ':', !Ref 'AWS::AccountId', ':', !Ref ProjectId ] ]
        detail:
          referenceType:
            - branch
          event:
            - referenceCreated
            - referenceUpdated
          referenceName:
            - main
        source:
          - aws.codecommit
      Description: >-
        Rule for Amazon CloudWatch Events to detect changes to the source
        repository and trigger pipeline execution
      State: ENABLED
      Targets:
        - Id: ProjectPipelineTarget
          Arn: !Sub >-
            arn:${AWS::Partition}:codepipeline:${AWS::Region}:${AWS::AccountId}:${ProjectId}-Pipeline
          RoleArn: !GetAtt
            - ToolChainRole
            - Arn
      Name: Demo_Source_Event

  DemoPipeline:
    DependsOn:
      - ToolChainRole
      - ArtifactBucket
      - CodeBuildProject
    Type: 'AWS::CodePipeline::Pipeline'
    Description: Creating an AWS CodePipeline
    Properties:
      RoleArn: !GetAtt
        - ToolChainRole
        - Arn
      Name: !Sub '${ProjectId}-Pipeline'
      ArtifactStore:
        Type: S3
        Location: !Ref ArtifactBucket
      Stages:
        - Actions:
            - ActionTypeId:
                Owner: AWS
                Category: Source
                Version: 1
                Provider: CodeCommit
              Configuration:
                PollForSourceChanges: false
                RepositoryName: !Ref ProjectId
                BranchName: main
              InputArtifacts: []
              OutputArtifacts:
                - Name: !Sub '${ProjectId}-SourceArtifact'
              RunOrder: 1
              Name: ApplicationSource
          Name: Source
        - Actions:
            - ActionTypeId:
                Owner: AWS
                Category: Build
                Version: 1
                Provider: CodeBuild
              Configuration:
                ProjectName: !Ref ProjectId
              InputArtifacts:
                - Name: !Sub '${ProjectId}-SourceArtifact'
              OutputArtifacts: []
              RunOrder: 1
              Name: PackageExport
          Name: Build

Outputs:
  WebsiteUrl:
    Description: URL of S3 Website
    Value: !GetAtt TargetS3Bucket.WebsiteURL
Step 5: Create the Pipeline Stack
Grab the template from above and change the value of the below parameters.
- ProjectId: An Id for your project(in lowercase only)
- WebsiteS3Bucket: Bucket name for your React app
- CodeBucket: Bucket in which you have stored zipped code
- CodeKey: Key of the zipped code
Save the template as pipeline.yml and follow the below steps.
- Login to AWS Management Console, navigate to CloudFormation and click on Create stack
- Click on “Upload a template file”, upload pipeline.yml and click Next
- Enter the stack name and click on Next. In the configuration, keep everything as default and click on Next.
- In the events tab of the stack, you can view the status.
- Once the stack is successfully created, go to the Output tab
- You can get the website URL from here and hit the endpoint

On clicking the above URL we get the below screen- pretty basic what react create app provides as default

Step 6: Make some changes to the code and push it to codecommit
Now that we were able to see the first deployment, let’s make some changes to the code and push it to the code commit.
I am using cloud9 and it comes with AWS-managed temporary credentials with my IAM user. So If my IAM user has CodeCommit access, I can clone the repo by doing the-
CodeCommit Repo -> Clone URL -> Clone HTTPS
Going to the terminal and issuing clone command like below.
git clone https://git-codecommit.eu-west-1.amazonaws.com/v1/repos/my-appThis clones the project for me into the IDE.
If you are using a local computer, you will need HTTPS credentials that you can generate from your IAM user(if only you have permission). You can follow this tutorial to set up your git locally with credentials.
Once the project is cloned, let’s edit the App.js
Then issue the below commands to push your changes.
git status
git commit -a -m "First try"
git push
After the code push, you can go to your pipeline and see that the pipeline is triggered.

Once your pipeline is successful, you can go to your website URL again and see that changes have been propagated.
Let’s go to the URL http://preetitest-website.s3-website-eu-west-1.amazonaws.com

For this tutorial URL was: http://preetitest-website.s3-website-eu-west-1.amazonaws.com
By the way, don’t try the above URL because after writing this post, I am gonna delete everything. So by the time you will read this. the above link will no longer work.
Conclusion
This post was all about react app deployment from CodeCommit to S3.
Finally, let’s summarize what we did in this post.
- We created a react app from scratch and tested it locally
- We learnt how to deploy a react app to S3
- Created a CodeCommit repo with our sample code using CloudFormation
- Created a Code pipeline using CloudFormation
- Made changes to the code and pushed to CodeCommit
- Verified the pipeline triggering on code push
- Gathered the S3 website URL and checked the latest deployment
Enjoyed the content?
Subscribe to our newsletter below to get awesome AWS learning materials delivered straight to your inbox.
Don’t forget to motivate me by-
- Adding a comment below on what you liked and what can be improved.
- Follow us on
- Share this post with your friends
Suggested Read:
- Setup an S3 Bucket CORS Configuration using CloudFormation
- AWS S3 Storage Classes: All you need to know
- How to Create an EC2 instance in an existing VPC using CloudFormation
- Attach an IAM role to an EC2 instance using CloudFormation
- Understand IAM PassRole to Secure your AWS Infrastructure
- Most Common types of Cyber Attacks in 2020
- Create DynamoDB table using CloudFormation
- How to Create S3 Bucket Policy using CloudFomation
- Provision ACM certificate using CloudFormation
- Create API Gateway Custom Domain using CloudFormation
- AWS SQS Standard vs FIFO Queue