How to Install Apache Web Server on Amazon Linux 2023
Dear Reader, I hope you are doing well. In one of my previous tutorials, we learnt to install Apache on Amazon Linux 2. Today, I am here to help you install Apache Web Server on Amazon Linux 2023.
You can also check out my other post to install Python, Git, Ansible, Java, Docker etc. on Amazon Linux EC2 Instance.
So shall we start?
Alright !!!
Don’t want to miss any posts from us? join us on our Facebook group, and follow us on Facebook, Twitter, LinkedIn, and Instagram. You can also subscribe to our newsletter below to not miss any updates from us.
A bit on Amazon Linux 2023 and Apache Web Server
Amazon Linux 2023: Amazon Linux 2023 or AL2023 is a recently launched Linux AMI by AWS. It provides an environment that offers long-term support with access to the latest innovations in Linux.
Apache Web Server: Apache Web Server or Apache HTTP Server is one of the widely used web servers when it comes to serving web content online. Moreover, It is open-source and easy to set up.
However, cloud being unfamiliar, we do face problems in the most minor things. That’s why, I will guide you in a step by manner on how you can install an Apache web server, customize it with our own code and view it locally on your browser.
Steps to Install Apache Web Server on Amazon Linux 2023
- Launch an EC2 Instance(Linux 2023)
- Connect to your Linux 2023 Instance
- Install Apache Web Server on Amazon Linux 2023
- Configure the Security Group of instance to allow internet traffic
- Verify the Installation
- Customize/Add the web page
- View Customized/Added Web page
Let’s get started …
Step 1: Launch an EC2 Instance(Linux 2023)
We need an EC2 instance running on Amazon Linux 2023 AMI. If you already have that, feel free to move to step 2. Otherwise, continue with this step.
You can refer to my previous tutorial to launch an EC2 instance in AWS.
Things mostly remain the same, however, ensure that you are choosing Linux 2023 AMI as shown below.

Step 2: Connect to your Amazon Linux 2023 Instance
Once you are done with step 1, you have an up-and-running EC2 instance. It’s time to connect to the instance. I will be using the EC2 instance connect feature for this as it lets me SSH into the EC2 instance from the web browser itself.
However, if you want to usual SSH, feel free to use the below command from your terminal.
ssh -i /path/my-key-pair.pem ec2-user@instance-public-ipSteps to SSH from the Browser using Instance Connect
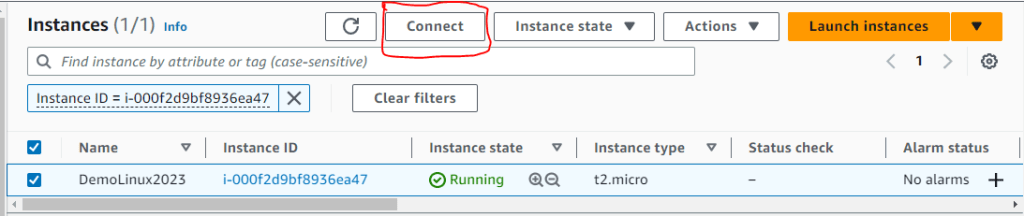
1. Select your created instance and click Connect as highlighted below
2. Once, you click Connect, you will see a screen with the default username for a Linux 2023 instance.

verify that ec2-user is showing in the username field and click Connect.
A new browser window opens and you are connected to your instance within seconds.
Awesome !!!
We are all set to install the Apache Web Server or httpd on our Amazon Linux 2023 EC2 instance. Let’s move to the installation part in the next step.
Step 3: Install Apache Web Server on Amazon Linux 2023
Below I am specifying the set of commands that you need to run to install the Apache Web Server on your Amazon Linux 2023 instance. Also, note that you will use sudo(root privilege ) to run all these commands. The reason is that whenever you try to install, remove or change any software, you must have root privilege to do such tasks.
If you have used Amazon Linux 2, you might remember that we used to use the yum command and used to install httpd from the amazon-linux-extras repo. In Amazon Linux 2023 dnf is the primary package manager. The yum will continue to work for backward compatibility but it’s recommended to use dnf.
So here is the list of commands to install Apache Web Server on Amazon Linux 2023-
sudo dnf update -y
sudo dnf list | grep httpd
sudo dnf install -y httpd.x86_64
sudo systemctl start httpd.service
sudo systemctl status httpd.service
sudo systemctl enable httpd.service
Explanation of the above commands that we will run-
Step 1: Update the System Package to Latest
Let’s start updating the packages to the latest ones before installing the Apache web server to httpd.
sudo yum update -yStep 2: Search for the httpd package
Apache Web Server package is known as httpd for Linux systems. Let’s search for it by below commands.
sudo dnf list | grep httpd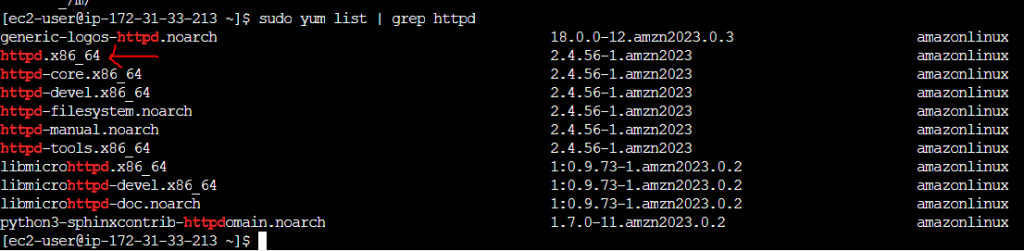
Found the package as seen in the screenshot(httpd.x86_64).
Step 3: Install Apache Web Server
sudo yum install -y httpd.x86_64
As soon as you hit the above command, apache is installed quickly and you see the above message.
Step 4: Start the Apache Web Server
We are done with the installation. Time to start the Apache web server. Fire the below command to start the server.
sudo systemctl start httpd.serviceWe have started the service, Let’s check the service status.
Step 5: Check the Server Status
sudo systemctl status httpd.service
The server is running now as you can see in the screenshot.
Step 6: Configure Apache to run on the system boot
It is your web server and you always would like it to auto-start on system boot. Isn’t it?
Because of course every time your system boots or restarts, you don’t want to start the server again and again. Instead, we should automate this.
You can do so by the below command
sudo systemctl enable httpd.service
Our web server is already installed and started in your Linux 2023 instance. But if you try to access it by hitting the public IP you will get an error like This site can’t be reached.
Why?
Because our EC2 instance doesn’t allow web traffic yet.
On the security group, only SSH is allowed as of now.
Let’s change that.
Step 4: Change the Security Group of the Instance to allow ports 80
Let’s allow web traffic on port 80(Internet traffic for HTTP).
Click on the Security Tab of your EC2 instance details screen and you should see the security group below.
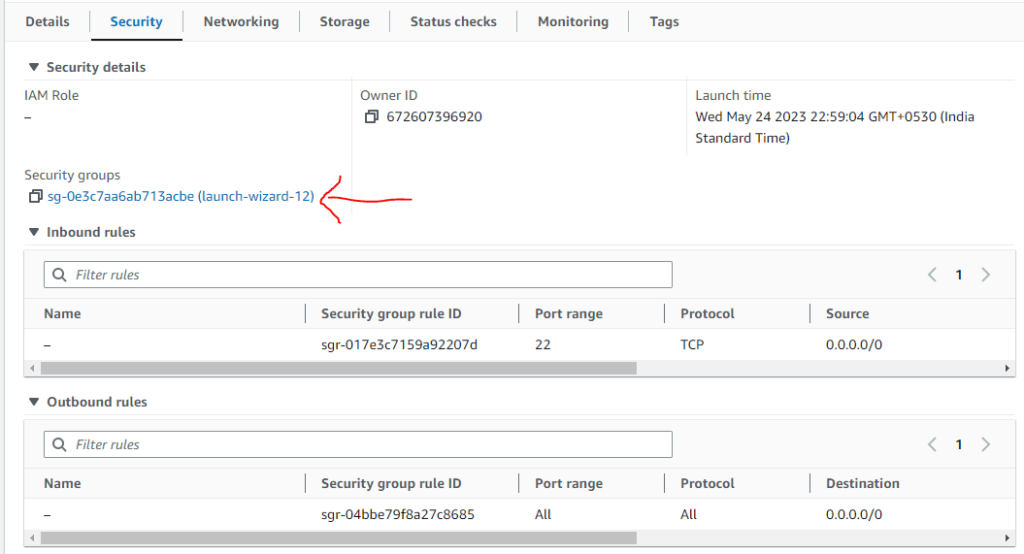
Click on the Security Group Id link -> And click on Edit Inbound Rule
After that, click on Add rule
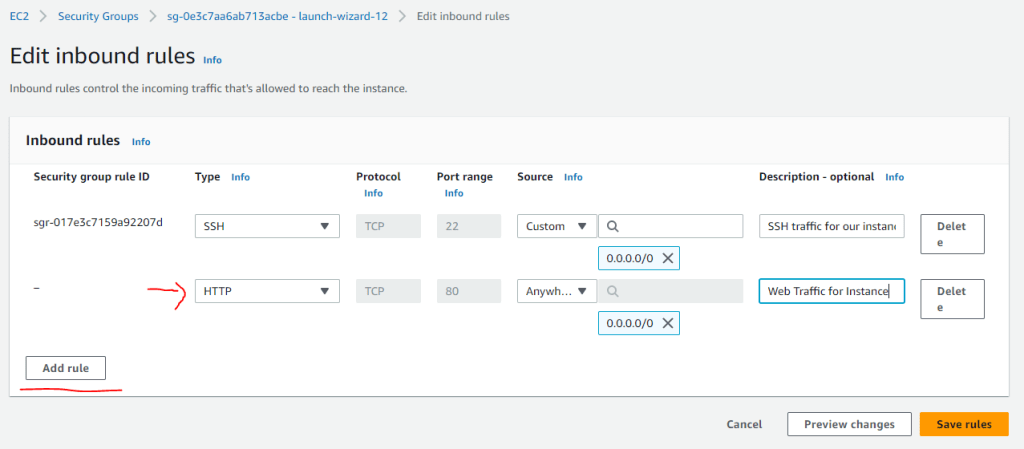
Specify the rule for HTTP Web traffic from anywhere as shown in the above screenshot.
Click on Save rules.
Step 5: Verify the Installation
We have installed and started the Apache web server in our Amazon Linux 2023 instance.
The instance also allows web traffic now, Let’s get the public IP of the instance and see what’s happening.
You can get the public IP of the instance by clicking the instance Id on the instance details screen as shown below.

Hit the public IP.
And I see the below page.

Well, I was expecting an Apache default webpage however got just this. Let’s check if there is an HTML file in the document root, if not let’s add one.
Step 6: Customize/Add the index.html
As we know that the document root is /var/www/html, let’s check the place to see if there is an HTML file.

There is no HTML file present in the document root. Let’s add one.
DocumentRoot: Document Root is the directory from which Apache looks for and serves web files on your request. So we will create an index.html in /var/www/html folder
Create index.html
I used sudo nano command to create a file.
sudo nano /var/www/html/index.htmlOnce, the editor opens up, paste the below content into the editor as shown in the screenshot below.
<!DOCTYPE html>
<html>
<body>
<h1>Hello World !!</h1>
<p>Welcome to CloudKatha from my Amazon Linux 2023</p>
</body>
</html>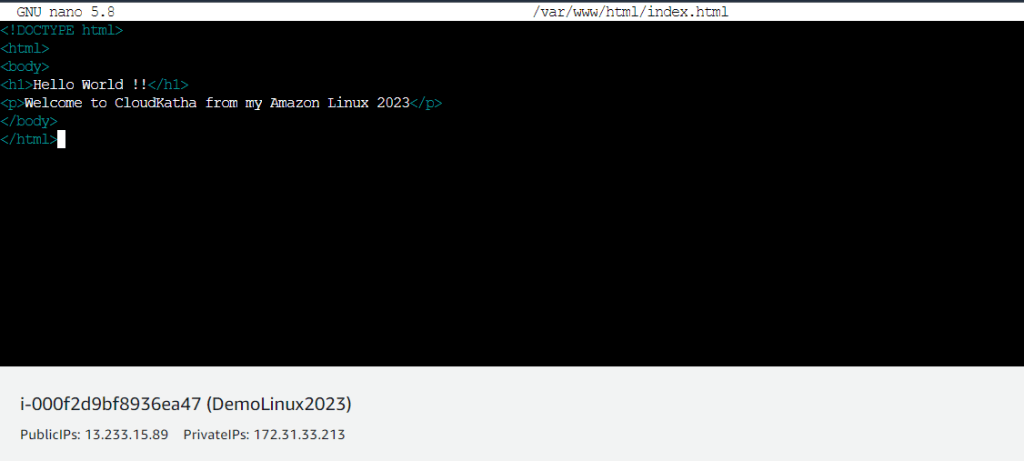
Press CTRL + X, save and exit.
Step 7: View the Customized/Added web page
This time when you enter public IP into the browser, you will see your customized page like below.

Congratulation !!!
You have installed and customized the Apache Web Server on Amazon Linux 2023.
Some other important commands:
Here are a few more commands that you might find useful during your journey with the Apache web server.
1. Restarts Apache Web server
sudo systemctl restart httpd.service 2. Stop Apache Web Server
sudo systemctl stop httpd.service3. Prevent Apache from loading on the system boot
sudo systemctl disable httpd.service4. Force Apache Web Server to refresh configuration files
sudo systemctl reload httpd.service Conclusion:
In this post, we learnt to Install Apache Web Server on Amazon Linux 2023 Instance.
- We learnt a bit about Amazon Linux 2023 and Apache Web Server.
- We also learnt that we use dnf package manager to install or remove any package in Amazon Linux 2023
- Then, we launched an EC2 instance with Amazon Linux 2023 and connected to the instance using EC2 connect feature and used a set of commands to install the Apache web server.
- We updated the security group of instances to allow web traffic using port 80. Finally, we added our own HTML file and viewed our web page
Feel free to drop a comment in case you face any issues or just to share feedback.
Enjoyed the content?
Subscribe to our newsletter below to get awesome AWS learning materials delivered straight to your inbox.
Don’t forget to motivate me by-
- Adding a comment below on what you liked and what can be improved.
- Follow us on
- Share this post with your friends
2 thoughts on “How to Install Apache Web Server on Amazon Linux 2023”