How to Install Java 8 on AWS Cloud9 IDE
This quick post will help you install Java 8 on AWS cloud9 IDE. By default, cloud9 is on the Linux platform and it runs Java 7. So you need to install java8 to get started with your development.

While creating a cloud9 environment there are three options for platforms to choose from as you can see in the above screenshot as well.
- Amazon Linux
- Amazon Linux 2
- Ubuntu Server 18.04 LTS
Please note that, if you create a cloud9 IDE using an Ubuntu server, it already comes with java8. However, I will provide installation commands for Linux as well as the Ubuntu server for your reference.
If you want to have the command straightaway, you can find them below for Linux as well as Ubuntu Server.
However, If you would like to understand each command and see the installation step by step, keep reading the post till the end.
For Amazon Linux:
java -version
sudo yum -y update
sudo yum -y install java-1.8.0-openjdk-devel
sudo update-alternatives --config java
sudo update-alternatives --config javac
java -version
For Ubuntu Server:
java -version
sudo apt update
sudo apt install -y openjdk-8-jdk
sudo update-alternatives --config java
sudo update-alternatives --config javac
java -version
Steps to Install Java 8 on AWS Cloud9 IDE
You May Also Read:
Step 1: Check Java Version
I always start by checking the Java version. you can run the below command for Linux/Ubuntu
java -versionWhen you run this command in a newly created cloud9(Linux) environment, you will see output like below.
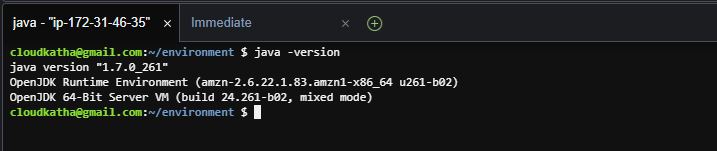
This proves that by default cloud 9 on Linux has Java7 installed. So let’s proceed with step 2.
Step 2: Install Latest Security Updates
After checking the java version now we know that we need to install java8. But before doing that let’s install the latest security updates. It’s a good security practice to update the latest security updates.
Amazon Linux:
sudo yum -y updateUbuntu Server:
sudo apt updateStep 3: Install OpenJDK 8
The latest security updates are installed so let’s install openjdk8 now
Amazon Linux:
sudo yum -y install java-1.8.0-openjdk-develUbuntu:
sudo apt install -y openjdk-8-jdkStep 4: Switch the default Java env to OpenJDK 8
Run the below command to switch or upgrade the command line versions of the Java runner(java) and compiler(javac).
sudo update-alternatives --config java
sudo update-alternatives --config javac
Choose a selection number which contains java8 as shown below screenshot.

Step 5: Check the Java version Again
After doing the selection, let’s run the java – version again to ensure it’s pointing to opnejdk8 now.
java -versionStep 6: Remove Java7 Package
I always like to keep my environment clean and keep only the required things. As I don’t need java7 anymore so I am removing it with the below command
For Amazon Linux:
sudo yum remove java-1.7.0-openjdk-develWith the removal of java7 from the cloud9 IDE, installation of java8 in cloud9 IDE is complete.
Conclusion:
In this post, you learnt to install Java 8 on AWS cloud9 IDE. We also provided a set of commands for Linux as well as a Ubuntu server to install java8.
I hope this post was useful to you. In case of any issues please add in the comment section. We would love to resolve your issue.
If you liked my post, Please motivate me and help me get better by –
- Adding a comment on this post on what you liked and what can be improved.
- Follow Cloudkatha on –
- Subscribe to our newsletter to get notified each time we post new content.
- Share this post with your friends and colleagues
Please share your feedback and help us get better with time 🙂
Also Read:
- Everything you Should Know about AWS CodeStar
- Create an S3 Bucket Using CloudFormation
- Create DynamoDB Table Using CloudFormation
- Create an AWS Lambda Using Java
- Automate Provisioning of ACM Certificate using CloudFormation
- Install OpenJDK on Amazon Linux 2 Step by Step
- How to Install Java on Amazon Linux 2023
- Install Ansible on Amazon Linux 2023
- How to Install Ansible on Amazon Linux 2