
How to Install DynamoDB Locally on Windows 10
Are you learning, innovating and building on AWS? Do you know that it provides a generous free tier for 12 months to make yourself familiar with various services so that you can be comfortable while using them?
But what if you have exhausted your free tier? Amazon DynamoDB provides ways to run it locally on your system. As a result, you can innovate faster and cost-effectively.
In this post, you’ll learn to install DynamoDB on your local windows 10 machine.
What we’ll do in this post-
- We’ll install DynamoDB in our local windows 10 machine
- Configure it to work with AWS
- Create a table in DynamoDB locally
- See how DynamoDB local works/integrates with various AWS SDK such as JAVA, Node.js and Python
Alright, first thing first, let’s get to know DynamoDB a bit and why a local version is needed.
Don’t want to miss any posts from us? join us on our Facebook group, and follow us on Facebook, Twitter, LinkedIn, and Instagram. You can also subscribe to our newsletter below to not miss any updates from us.
Amazon DynamoDB and Need for DynamoDBLocal
Amazon DynamoDB is a very popular NoSQL database. It is fully managed, serverless and provides single-digit Milli second performance at any scale. As a result, it is used by hundreds of thousands of customers.
But, working with DyanmoDB of course has a cost associated with it. If you are also in the early stage of your project and want to explore this service locally without worrying about the cost. I will help you install DynamoDB locally on Windows 10.
Related: How to Create DynamoDB Table on AWS With On-Demand Capacity
Overview of DynamoDB Local & Downloadable Version
With the local version, you can develop applications using DynamoDB and test them without accessing the DynamoDB service. It will save you read/write throughput, storage, and data transfer cost. Additionally, you can work offline.
As you might know, DynamoDBLocal is available as a download, as an Apache Maven dependency, or as a Docker image. In this post, we will download it to the Windows 10 system and use it locally.
Alright, enough talk – let’s get our hands dirty.
Prerequisite
- AWS Account: How to Setup Free Tier AWS Account in Right Way
- Java 8 or later
- AWS CLI
Steps to Install DynamoDB Locally on Windows 10
- Step 1: Install Java on Your System
- Step 2: Download DynamoDB
- Step 3: Extract the Folder
- Step 4: Run the DynamoDB Locally
- Step 5: Authenticate DynamoDB to run Locally
- Step 6: Verify DynamoDB Local Installation
- Step 7: Use DynamoDB Locally to Create a Table
- Step 8: Learn DynamoDB Local Integration with SDKs
Step 1: Install Java on Your System
DynamoDB downloadable version needs JRE(Java Runtime Environment) 8. x or later in the system to run.
You can check if you have Java installed on your system.
Open Command Prompt and enter java -version command.
Windows-> Start -> Cmd -> java -version
java -versionIf you see the message below – that, means you already have JAVA/JRE in your system. So you can jump to step 2.

Otherwise, you will see messages like –

This means Java is not installed in your system.
Let’s install Java
Navigate to the Official Java Downloads page and download it for your system as shown below.
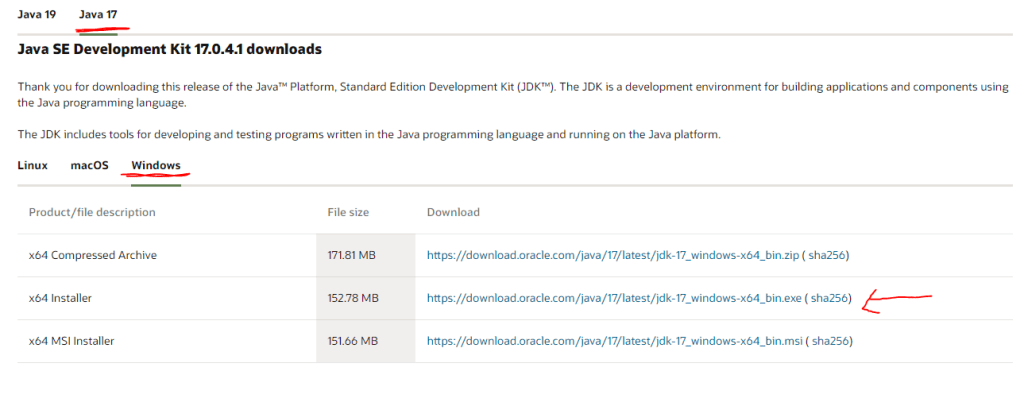
At the time of writing this Java 17 is the LTS or long-term support version so I am installing that. Once the download completes, click Open to run the downloaded file. Click next, next and you will see the message as java is downloaded successfully on your system.
By this time, if you check the Java version again by java -version, you will see like
That means Java is running in our system and we are ready to go with DynamoDB local installation. However, If you still see Java is not recognized as an internal or external command, try setting the environment variable manually. You can use this tutorial to do so.
Step 2: Download DynamoDB
Navigate to Official DynamoDB page and download DynamoDB for from one of the following locations.

Click on one of the region links. For example, I am downloading from the Mumbai region link. As you are doing on Windows, use .zip link as shown in the above screenshot.
Wait for it to finish the download. Then move to the next step to extract it in a folder.
Step 3: Extract the Folder
Now that we have downloaded it, it gets downloaded as a zip archive as you can see.

After you download the archive, extract the contents and copy the extracted directory to a location of your choice. Click Show in folder to go into the folder.
Right-click on the zip file and click Extract All

This is how it looks like after the extraction-
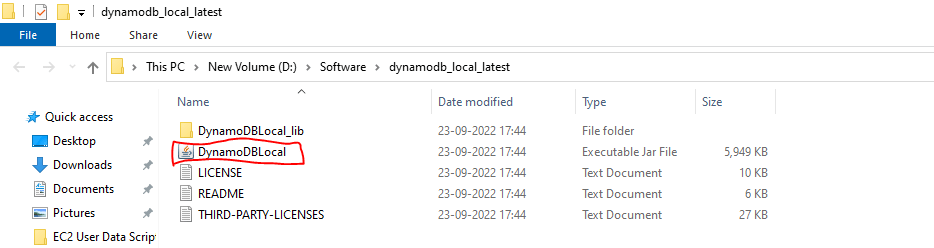
Did you notice the DynamoDBLocal jar? Now that we have it ready, we are ready to run it locally.
Step 4: Run the DynamoDB Locally
Open a command prompt window, navigate to the directory where you extracted DynamoDBLocal.jar
For example, I have opened a terminal in the below path where I have extracted DynamoDbLocal.jar –

Now run the below command to run the DynamoDB executable jar file.
java -Djava.library.path=./DynamoDBLocal_lib -jar DynamoDBLocal.jar -sharedDbOnce you run the above command, you should know a few things-
- DynamoDB processes incoming requests until you stop them.
- To stop DynamoDB, press Ctrl+C at the command prompt
- By default, DynamoDB uses port 8000
- If you want to run it on other ports, use the -port runtime option
- We have specified -sharedDb option, which means DynamoDB will only create a single database file shared-local-instance.db. All the program that connects to local DynamoDB, uses the same.
If you see the screenshot, I have tried to run it without specifying a port and with specifying a port.
Without port:

With Port :

You will notice that when you don’t specify a port, DynamoDB automatically start on port 8000. When you specify a port, it starts on the port specified by you as you can see in the above screenshots.
Step 5: Authenticate DynamoDB to run locally
Before you can access DynamoDB from your code or CLI, you must set up your credential to authorise your application to access DynamoDB.
If you don’t have CLI installed and configured in your system, use my previous tutorial to set it up.
Link: How to Install and Configure AWS CLI in Windows
If you already have CLI installed, you can use the below command to configure it with your access key/secret key.
aws configureOnce CLI installation and configuration are done, you can proceed to DynamoDB local installation verification step.
Step 6: Verify DynamoDB Local Installation
We have installed DynamoDB locally. Let’s verify if it got installed correctly by firing the below command-
aws dynamodb list-tables --endpoint-url http://localhost:8000Notice the difference in the command. If we were to fire this on the actual DynamoDb service, the command would look like this-
aws dynamodb list-tables–endpoint-url http://localhost:8000, is specified to indicate that you want to run the command on localhost which is running on port 8000.

The list is empty because of course, we have just installed the DB and not created any table. We’ll do that in the next step.
Note: Please note that DB is running only when you keep the command prompt tab open. Once to close the tab or use Ctrl+C, the instance will shut and DB will not be accessible.
If you try to list the table, you will get an error like-

Step 7: Use DynamoDB Locally to Create a Table
As you know, we use create-table command to create a DynamoDB table. Here is what the syntax looks like-
 aws dynamodb create-table \
   --table-name Employee \
   --attribute-definitions AttributeName=EmployeeId,AttributeType=S\
   --key-schema AttributeName=EmployeeId,KeyType=HASH \
   --provisioned-throughput ReadCapacityUnits=5,WriteCapacityUnits=5 \
   --endpoint-url http://localhost:8000
However, as we discussed in our previous tutorial , to write a multi line command “\” doesn’t work on windows and you need to replace it with the ^(carat) symbol.
This is what it looks like after replacing it with ^
 aws dynamodb create-table ^
   --table-name Employee ^
   --attribute-definitions AttributeName=EmployeeId,AttributeType=S^
   --key-schema AttributeName=EmployeeId,KeyType=HASH ^
   --provisioned-throughput ReadCapacityUnits=5,WriteCapacityUnits=5 ^
   --endpoint-url http://localhost:8000
Let’s run the create-table command-

As you can see the table is created and the status is Active now.
Let’s try to list the table again.
And Yayyy…..

We see our newly created table in the list above. That means we have successfully created a DynamoDB table locally.
DynamoDB Local Table and AWS SDK
While working with SDK, always remember that when you are creating the DynamoDB client you have to mention –endpoint-url http://localhost:8000 so that it works.
For example-
1. DynamoDB Local Integration with Python-
import boto3

ddb = boto3.client('dynamodb', endpoint_url='http://localhost:8000')
response = ddb.list_tables()
print(response)
2. DynamoDB Local Integration with Node.js
AWS.DynamoDB = new AWS.DynamoDB({
  region: "ap-south-1",
  endpoint: "http://localhost:8000",
});
3. DynamoDB Local Integration with Java
DynamoDbClient client = DynamoDbClient.builder()
                        .region("ap-south-1")
                     .endpointOverride(URI.create("http://localhost:8000"))
                        .build();

DynamoDB dynamoDB = new DynamoDB(client);
Conclusion
In this post, we learnt how to install DynamoDB locally on Windows 10 System. Firstly we installed Java on our system as DynamoDB local needs it. Secondly, we downloaded the DynamoDB package and installed it. Finally, we verified the installation and created a table locally.
We also saw, how to work with DynamoDB local table using various SDKs.
Hope the post was useful to you. Feel free to leave a comment or provide feedback.
Enjoyed the content?
Subscribe to our newsletter below to get awesome AWS learning materials delivered straight to your inbox.
Don’t forget to motivate me by-
- Add a comment below on what you liked and what can be improved.
- Follow us on
- Share this post with your friends