How to Create DynamoDB Global Table using AWS CLI
In our previous posts, we learnt how to create DynamoDB global table using AWS console and CloudFormation.
In today’s post, we’ll learn how to create a DynamoDB global table using AWS CLI. We will also see the issue that we face while doing this from CLI in the windows system and how to resolve that.
PS: If you want to create a DynamoDB table using AWS CLI, check out my previous post on the same.
Related: 5 Ways to Create and Manage Resource In AWS
DynamoDB Global Table Overview
DynamoDB global table provides you with the capability to replicate your DynamoDB table data into regions of your choice.
If you are using DynamoDB in your application and your application is being used by users across the globe, you can create global tables to provide better latency in data access to your users.
You must have stream enabled on your table for global table creation. Also if your table capacity is Provisioned, you need to configure auto scaling.
DynamoDB Global Table Version Considerations
Amazon DynamoDB global table has two different versions.
If you are creating your DynamoDB global table now, AWS recommends using Version 2019.11.21 as it is the latest, better and provides more capabilities.
So in this post, we are creating a DynamoDB Global table version 2019.11.21 using AWS CLI.
Alright?
Let’s get started…
How to Create DynamoDB Global Table using AWS CLI?
If you have ever created a global table in Version 2017.11.29 using the console, you know that to create a DynamoDB global table, you need to use create-global-table command.
Ideally, create-global-table command creates a global table from your existing DynamoDB tables by creating the replication relationship between regions.
However, this is not the same in Version 2019.11.21.
Do you remember my post on Creating DynamoDB Global Table using AWS console?
In that post, we saw that we create a table in one region and then we go to the Global table tab to add replica regions. When you add a replica region, the table need not be created previously. Instead, the table gets created on the fly and then added as part of the replica.
This is what we are going to do today.
Steps to Create DynamoDB Global Table using AWS CLI
- Set Up AWS CLI
- Create a Table (Employee) in ap-south-1 (Mumbai)
- Update Table Employee in Mumbai to Add Replica in North Virginia(us-east-1)
- Validate DynamoDB Global Table Creation
- Validate Data Replication
Step 1: Set Up AWS CLI
Before using AWS CLI to set up DynamoDB global tables, you need to install CLI on your machine and configure it using your credentials(access key/secret key).
Here is a step-by-step tutorial on how to do it – How to Install and Configure AWS CLI in your System.
In short, If I say, you need to download and install AWS CLI in your system. After that, you need to use aws configure command to configure CLI using your credentials.
Enter your access key, secret key , default region and output format one by one and that’s it. You can verify it using a simple command like aws s3 ls to see if it works fine.

Tip: If you are someone like me who doesn’t want to install a tool just to test one new thing. AWS provides you will with browser-based CLI which is called CloudShell. Open a CloudShell terminal by clicking on the terminal icon as shown below.

You can read more about AWS CloudShell here: All You need to Know about AWS CloudShell – Your Browser Based CLI
Step 2: Create a Table (Employee) in ap-south-1 (Mumbai), with DynamoDB Streams enabled (NEW_AND_OLD_IMAGES).
You can use create-table command to create a DynamoDB. Please specify the region in which you want to create your table via –region option.
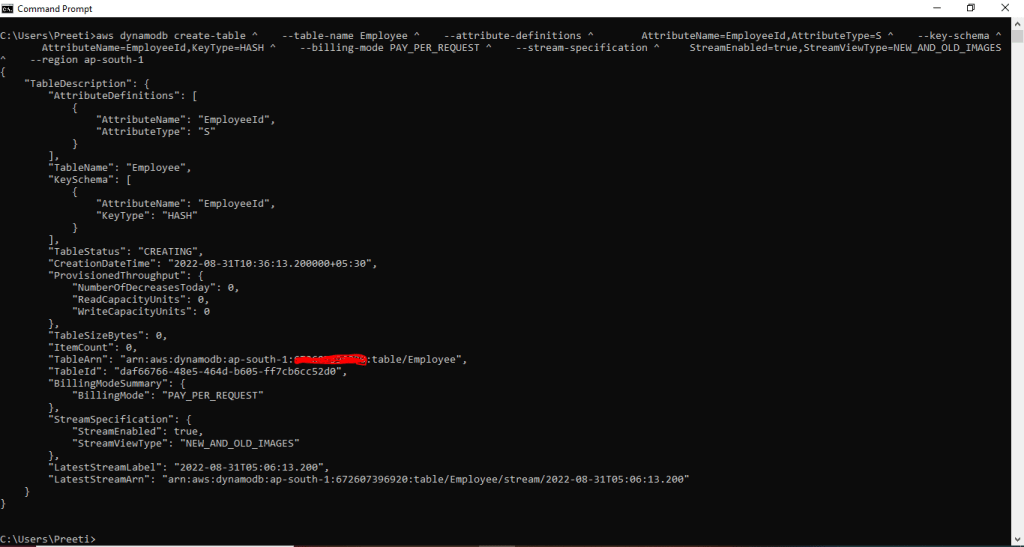
The command to create a table Employee in Mumbai region with stream enabled is –
aws dynamodb create-table \
    --table-name Employee \
    --attribute-definitions \
        AttributeName=EmployeeId,AttributeType=S \
    --key-schema \
        AttributeName=EmployeeId,KeyType=HASH \
    --billing-mode PAY_PER_REQUEST \
    --stream-specification StreamEnabled=true,StreamViewType=NEW_AND_OLD_IMAGES \
    --region ap-south-1
Let’s fire the above command and see what happens-
Before you fire the above command, please note that the trailing \ is added above to extend the command to the next line. This works well on linux however, if you have AWS CLI installed on a windows system like me- then that won’t work, You need to use a windows alternative(^) instead.
So above command for my windows system looks like this-
aws dynamodb create-table ^
    --table-name Employee ^
    --attribute-definitions ^
        AttributeName=EmployeeId,AttributeType=S ^
    --key-schema ^
        AttributeName=EmployeeId,KeyType=HASH ^
    --billing-mode PAY_PER_REQUEST ^
    --stream-specification ^
     	StreamEnabled=true,StreamViewType=NEW_AND_OLD_IMAGES ^
    --region ap-south-1
Open your command prompt and paste the command there and hit enter.
If you see the above output, the table status is still Creating only.
Step 3: Update Table Employee in Mumbai to Add Replica in North Virginia(us-east-1)
As soon as we update our table in the Mumbai region to add a replica table in us-east-1, a table is created in us-east-1 and added as part of the global table.
You use update-table command to update your table.
Below is the command to update the Employee table in Mumbai region with one replica in region us-east-1. Please note that you can create more then one replica at a time as well.
aws dynamodb update-table --table-name Employee --cli-input-json  \
'{
  "ReplicaUpdates":
  [
    {
      "Create": {
        "RegionName": "us-east-1"
      }
    }
  ]
}'
--region=ap-south-1
And don’t forget to replace \ with ^ in windows system.
Command for Windows System-
aws dynamodb update-table --table-name Employee --cli-input-json "{\"ReplicaUpdates\":[{\"Create\": {\"RegionName\": \"us-east-1\"}}]}" --region=ap-south-1
Once you paste the command and hit enter-
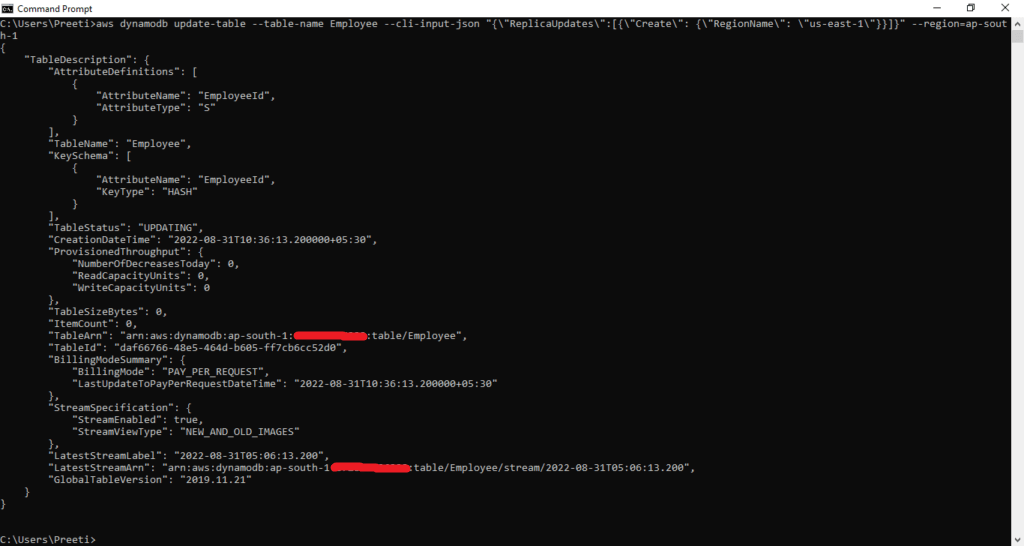
In the above output, you can see the global table version is 2019.11.21 and that’s what we wanted.
Step 4: Validate DynamoDB Global Table Creation
You can use describe-table command to check the table status. Table status will tell you if a replica has already been added to our table.
Command to check a table status
aws dynamodb describe-table \
    --table-name Employee --region ap-south-1
Windows version command
aws dynamodb describe-table ^
    --table-name Employee --region ap-south-1
Once you fire this- you see the replica details along with all the other details of the table.

This ideally confirms that our global table is created and it consists of replicas in ap-south-1(Mumbai) and us-east-1 region.
If you prefer to check the status in the console, you can do so by checking the Global Tab tab of your table. This is what it looks like.

Step 5: Validate Data Replication
We can verify the data replication between replicas by adding a data item in any of the replicas tables and checking the other replica tables to see if data is automatically replicated over there.
Let’s add a new item to the Employee table in ap-south-1(Mumbai) region.
You can use put-item command to put some data into the table.
The command to insert data into Employee table:
aws dynamodb put-item \
    --table-name Employee \
    --item '{"EmployeeId": {"S":"employee_1"}}}' \
    --region ap-south-1
Again on windows CLI command is :
aws dynamodb put-item ^
    --table-name Employee ^
    --item "{\"EmployeeId\": {\"S\":\"item_1\"}}" ^
    --region ap-south-1
Paste the command on the terminal and hit enter. This command doesn’t return any output.

Now that data is inserted into the table in the Mumbai region. Let’s wait for a few seconds, and then check to see whether the item has been successfully replicated to us-east-1 region.
Command to get an Item In us-east-1 region:
aws dynamodb get-item \
    --table-name Employee \
    --key '{"EmployeeId": {"S":"item_1"}}' \
    --region us-east-1
Windows version of same command:
aws dynamodb get-item ^
      --table-name Employee ^
	  --key  "{\"EmployeeId\": {\"S\": \"employee_1\"}}"  ^
	  --region us-east-1
Paste the command and hit enter. And hey, we can see that the data we inserted in the Mumbai region has automatically replicated to the us-east-1(North Virginia) region.

So data was replicated successfully.
Conclusion
In this post on How to Create DynamoDB Global Table using AWS CLI, we have seen how you can create a table in one region and update it to add more replicas in another region and in turn make a global table out of it.
We have also seen that stream must be enabled on the table and autoscaling should be enabled if the capacity mode is provisioned. Which is default capacity mode as well.
Hope the post was useful to you. Feel free to leave a comment or provide feedback.
Enjoyed the content?
Subscribe to our newsletter below to get awesome AWS learning materials delivered straight to your inbox.
Don’t forget to motivate me by-
- Add a comment below on what you liked and what can be improved.
- Follow us on
- Share this post with your friends