Getting Started with AWS Toolkit for Visual Studio Code 2022
The AWS Toolkit for Visual Studio is an open-source plugin or extension for VS Code editor. It makes it easier to develop, debug, and deploy serverless applications using Amazon Web Services.
The extension is available in the visual studio marketplace and supports visual studio 2022, 2019, and 2017.
Many of you have asked this question “How to Get Started With AWS Toolkit for Visual Studio?”. Although it’s not very difficult to set it up, sometimes it becomes confusing. Threrefore, I am here with this tutorial.
Okay, let’s get started …
Don’t want to miss any posts from us? join us on our Facebook group, and follow us on Facebook, Twitter, LinkedIn, and Instagram. You can also subscribe to our newsletter below to not miss any updates from us.
Prerequisite
- An AWS Account: Setting Your AWS Free Tier Account the Right Way
- VS Code version 1.42.0 or later: Better download the latest
- Supported OS: Windows, Linux, and macOS
- Access/Secret Key: Learn how to do it here
Steps of Getting Started with AWS Toolkit for Visual Studio Code 2022
- Step 1: Install VS Code in Your System
- Step 2: Install the AWS Toolkit for VS Code Extension
- Step 3: Setup Credential for AWS Toolkit in VS Code
- Step 4: Validate AWS Toolkit Setup
Step 1: Install VS Code in Your System
If you already have VS Code installed, feel free to jump to step 2.
If not, Naviage to VS Code official download page.
Once you navigate to the page, you will see the download page like below. Download vs code for your operating system and install it.

Step 2: Install the AWS Toolkit for VS Code Extension
Open the VS Code editor. Hover over the left side menu and click on the extension icon as shown below.

As you can see in the above screenshot, you can search for any extension available in the VS Code marketplace.
Type aws toolkit in the search bar as shown below and you will see AWS Toolkit.

Click on Install
Just choosing the extension will show you the details about it in the right pane as you can see.
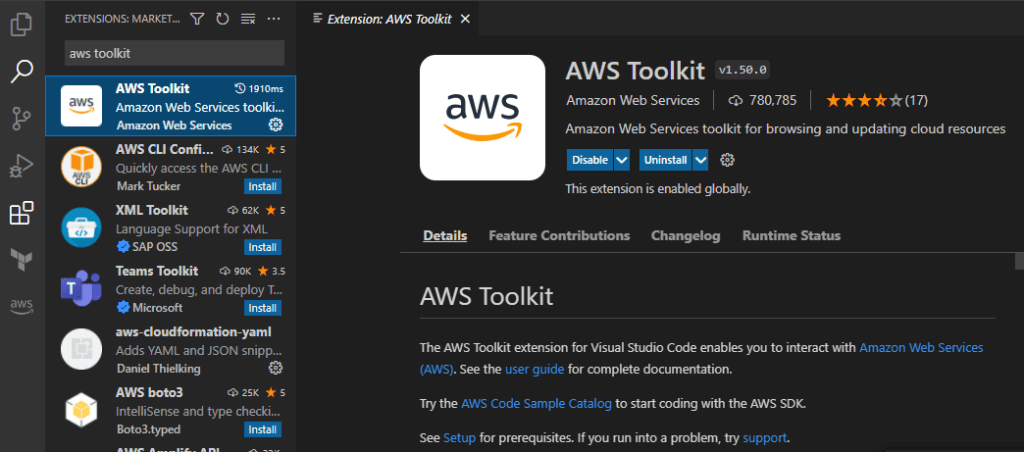
As you notice, I first did install it and then selected it. So it is already being shown as installed.
Step 3: Setup Credential for AWS Toolkit in VS Code
If you already have CLI setup done on your system, VS Code will automatically detect that. However, if that’s not the case. You can do the setup using the command pallet.
VS Code -> View -> Command Pallete…

Once you click on command pallete, these are the various options that you will see –

Click on Connect to AWS
It asks you to enter you access keys.

Enter your access key and hit enter.

Input the secret key
Once you hit enter, a crdential profile is created for you and you are connected to AWS now.
Step 4: Validate Setup
Click on aws from left side and it will open AWS explorer.

You can explore various services/resources from here. Please note that you can only see bucket in the region you are exploring.
For example, you can click on s3 and the bucket in north virginia. I explored it and can see all the objects in my bucket as well.

What’s Next?
Now that you have AWS toolkit installed, you can play around a bit. Try doing things like-
- Creating a Serverless application using Lambda and API Gateway
- User aws explorer to explore and manage your resources like s3 buckets, Amazon DynamoDB tables etc.
- Write CloudFormation template with auto completion and deploy to CloudFormation.
- Fire an AWS CLI command
- Create a CDK application and deploy it in AWS etc.
- Explore and let us know in comment , what feature you liked the most.
Conclusion
In this post, we learnt about getting started with AWS Toolkit for visual studio code 2022.
Firstly, we install VS Code in our system. Secondly we installed AWS Toolkit extension from VS Code marketplace. Thirdly, we connected AWS toolkit extension with our AWS account. Lastly, we validated the toolkit setup.
After the setup, we also saw what can be done using the extension. Overall, I hope the post was useful to you.
Enjoyed the content?
Subscribe to our newsletter below to get awesome AWS learning materials delivered straight to your inbox.
I hope you enjoyed this tutorial. If you have a question, feel free to drop in a comment. I will be more than happy to answer your query.
Meanwhile, you can also –