How to Create DynamoDB Global Table using AWS Console
Amazon DynamoDB global tables come really handy when you have a heavily used application and its users are spread worldwide.
Using DynamoDB global tables you can provide –
- Better latency while accessing data to your users despite their geographical location
- Better disaster recovery for your application as it supports region-level outage
- Meet compliance requirement
- Go global by adapting multi-region architecture
- Better overall user experience
In this post, I will show you how to create a DynamoDB global table using the AWS console.
Example Use case: I am implementing a DynamoDB global table with two replica regions.
- ap-south-1(Mumbai)
- ap-southeast-1 (Singapore)
Note: Please note that DynamoDB global tables are multi-master i.e. all your replicas can receive read and write both. Ideally, there is no concept of primary and secondary here. You can create any table first and then add other regions as replicas.
We have the basic idea, let’s get started with the creation of the DynamoDB global table.
Steps to Create DynamoDB Global Table using AWS Console
- Login to AWS Management Console and Navigate to DynamoDB Console
- Create a DynamoDB Table
- Navigate to the Global tables Tab
- Create a Replica in Another Region
- Validate Global Table Creation
- Validate Data Replication
Step 1: Log in to AWS Management Console and Navigate to DynamoDB Console
Login to AWS Management Console with your IAM user.
Once logged in, search for DynamoDB.

Click on DynamoDB as shown in the above screenshot to open DynamoDB.
Step 2: Create a DynamoDB Table
Once you click on DynamoDB, you are navigated to the DynamoDB dashboard which looks like below –

Click on Tables from the left navigation menu and then click Create table as shown below-

Once you are in the table creation screen, enter the Table name and Partition key (primary key).

Scroll down and leave table settings as default as you can see below. As you can see, by default auto-scaling is turned-on on the table which is a prerequisite for global table creation in case table capacity mode is Provisioned.

Scroll down and click on Create table.
The table is created and you see a success message.

As of now, we have created a DynamoDB table in a single region ie ap-south-1(Mumbai)
Time to add replicas 🙂
Step 3: Navigate to the Global tables Tab
Click on your table name and navigate to the table details screen.
Once in the table detail screen, click on the Global tables tab as shown below-
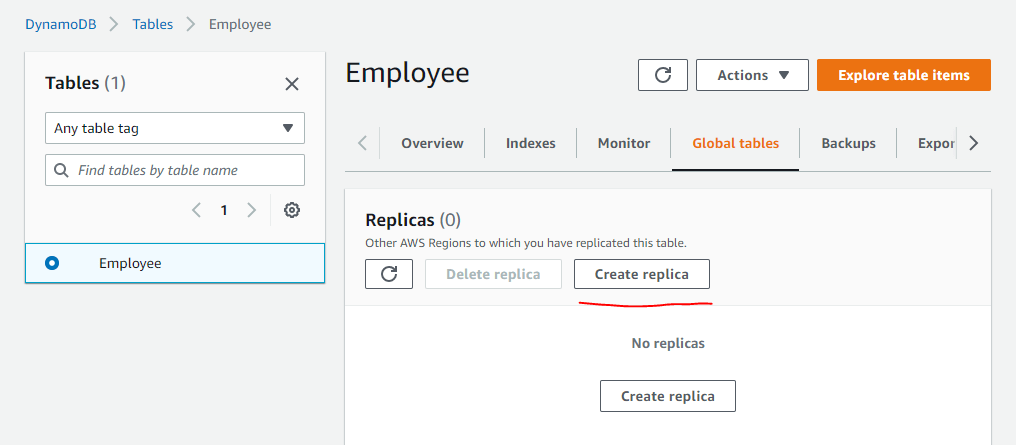
And, this is the place where all the magic configuration to make a single region table into a global table happens. You add replicas to your single region table and your table becomes a DynamoDb global table. Awesome, isn’t it?
Step 4: Create a Replica in Another Region
Click on Create replica and choose a region where you want to create a replica for your DynamoDB table.
Suggested Read: Factors to Choose a Region for Your Workload on AWS
I am going with the Singapore region just for example-

Note: Notice the above info icon, as you know the prerequisite for a global table is that stream should be enabled on all the replicas, the console is showing you that during the replica creation process it will enable stream.
Click on Create replica
Replica creation starts and it takes some time to create it. If your table is empty it gets created in a few minutes (5) if not, it will depend on your table size.

As you can see in the screenshot, the status is showing as Creating.
Step 5: Validate Global Table Creation
After some time, the replica creation finishes and replica status becomes Active as seen below-

Finally, we have a global table now with two replicas in region Mumbai and Singapore(Remember DynamoDB global table has no concept of primary and secondary- so all the tables participating in the global table are replicas only). If you want you can go ahead and add more replicas based on your need. However, keep in mind that cost will increase based on how many replicas you add.
Step 6: Validate Data Replication
Now that DynamoDB global table setup is done, Let’s validate the data replication. If all goes well, whenever we add/update/remove any data in any of the tables, the changes will get replicated to other replicas.
Let’s add some data to our DynanoDB table Employee.
Click on your table name then click on Explore table items.

You are navigated to the below screen-

Click on Create item.
Once you click on create item, you will see the below screen-

Enter the primary key value, and click Create item.
You get a success message like-

Let’s validate if data is replicated in other regions.
Change your region to the region in which you have your replica in my case Singapore.

And as you can see data is replicated in Singapore, which meant that our global table is set up successfully and data is being replicated. You can try adding more data in any of the replicas and it will get replicated to other replicas.
Conclusion
In this post, we learned to create DynamoDB global table using AWS Management Console. We also learned that in order to create a Dynamo DB global table, stream must be enabled on all the replicas.
By having Dynamodb global table, you can improve the user experience of a widely spread global application.
Hope the post was useful to you. Feel free to leave a comment or provide feedback.
Enjoyed the content?
Subscribe to our newsletter below to get awesome AWS learning materials delivered straight to your inbox.
Don’t forget to motivate me by-
- Add a comment below on what you liked and what can be improved.
- Follow us on
- Share this post with your friends